Episode 3

Episode 3

Ankle Fractures

Listen to Episode:

Objectives:

After listening to this episode, we hope that you can:


  1. Explain the Ottawa Ankle Rules.
  2. Conduct a comprehensive physical examination of the lower extremity.
  3. Understand the biomechanics of the ankle joint and the significance of the syndesmosis.
  4. Describe the Weber Classification System.
  5. Identify imaging features that are indicative of an unstable ankle fracture.
  6. Differentiate between indications for operative versus nonoperative management of ankle fractures, including an overview of basic fixation options.

Show Notes


Episode 3: Ankle Fractures

What are the Ottawa Ankle Rules?

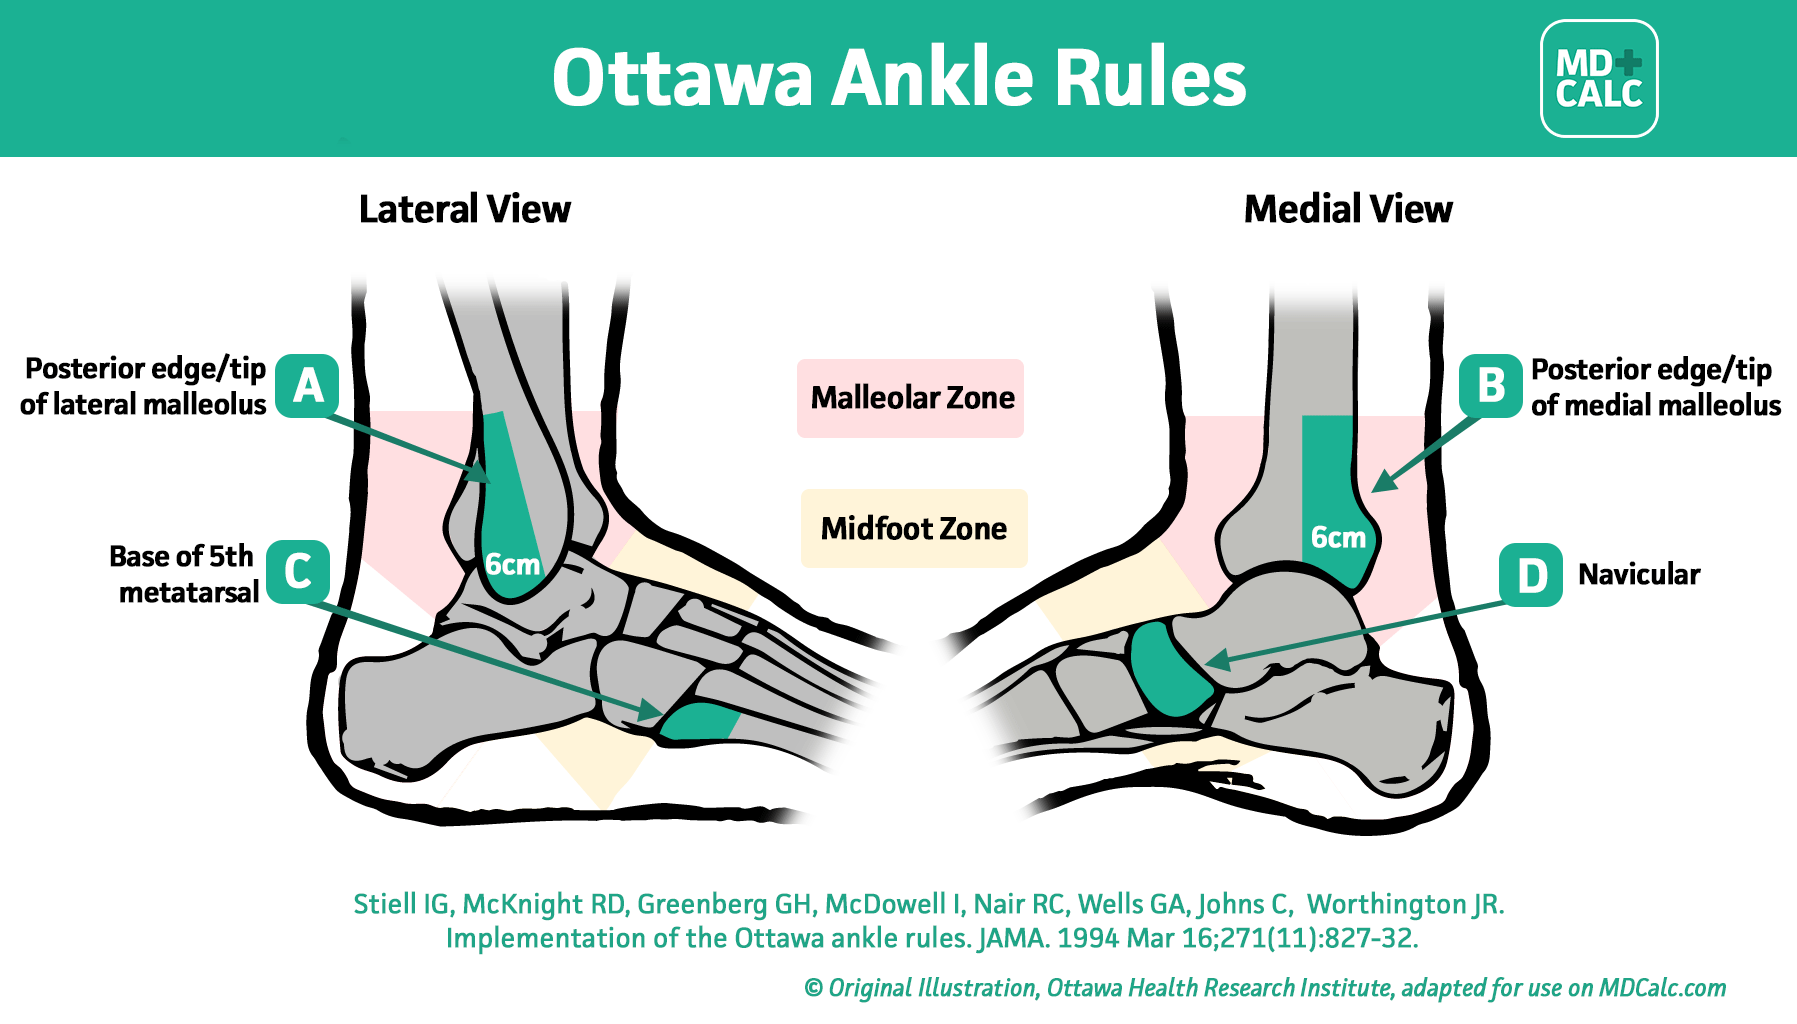
The Ottawa Ankle Rules are a set of guidelines developed to assist clinicians in deciding whether radiographic evaluation is necessary to rule out fractures in patients presenting with acute ankle and midfoot injuries. The primary purpose of these rules is to reduce the number of unnecessary radiographs, thus minimizing radiation exposure to patients and alleviating healthcare costs without missing clinically significant fractures.


The Ottawa Ankle Rules focus on the presence of pain in specific areas and the ability to bear weight both immediately after the injury and in the emergency department. According to the rules, an ankle radiograph series is only required if there is any pain in the malleolar zone and any one of the following criteria is met: bone tenderness at the distal 6 cm of the posterior edge of the tibia or tip of the medial malleolus, bone tenderness at the distal 6 cm of the posterior edge of the fibula or tip of the lateral malleolus, or an inability to bear weight immediately after the injury and for four steps in the emergency department.


Similarly, a foot radiograph series is indicated if there is pain in the midfoot zone and any one of the following criteria is met: bone tenderness at the base of the fifth metatarsal, bone tenderness at the navicular bone, or an inability to bear weight immediately and in the ED for four steps.


These criteria have been validated through extensive research and have demonstrated high sensitivity for detecting fractures, making the Ottawa Ankle Rules a valuable tool in the clinical assessment of ankle and midfoot injuries. These rules are summarized in the above image from MDCalc, an excellent point-of-care reference. 

What are the standard views & measurements of an ankle trauma series?

The standard views of an ankle trauma series are designed to provide complete visualization of the ankle joint, enabling the assessment of bony architecture, joint congruity, and potential traumatic injuries. This series typically comprises three primary views: the Anteroposterior (AP), Mortise, and Lateral views.

  • AP View

    The AP View of the ankle shows the joint in its natural anatomical position. This view is fundamental not only for assessing the overall alignment and structure of the ankle joint, but also for evaluating specific metrics that can indicate the presence of syndesmotic injury or disruption of the ankle mortise. Two critical measurements in this view provide valuable insights into the integrity of the ankle joint: Tibiofibular overlap and tibiofibular clear space.


    A. Tibiofibular Overlap: <10 mm of overlap between the lateral border of the posterior tibia and the medial border of the fibula on the AP view suggests a potential syndesmosis injury. The tibiofibular syndesmosis is a fibrous joint supported by ligaments, providing stability between the tibia and fibula. A reduced overlap indicates a separation or widening of the syndesmosis, often resulting from injury to the syndesmotic ligaments. 


    B. Tibiofibular Clear Space: >5 mm is considered abnormal. An increased clear space signifies a disruption of the syndesmosis, akin to decreased tibiofibular overlap, and suggests a potential instability or separation of the distal tibiofibular joint.

  • Lateral View

    The lateral view of the ankle is orthogonal to the mortise of the ankle joint. For an optimal lateral view, the distal fibula should be superimposed by the posterior portion of the distal tibia, and the talar domes should also be superimposed.


    In the lateral view, the talar dome should be centered under the tibial plafond with proper alignment and integrity of the ankle joint. This projection is invaluable for identifying any fractures of the posterior malleolus, and also allows for the calcaneus and talus to be viewed in their full profiles. Incorporating the base of the 5th metatarsal is also helpful for assessing potential lateral foot injuries.

  • Mortise View

    To obtain a Mortise view X-ray of the ankle, the patient is positioned with the leg extended and the foot internally rotated approximately 10-15 degrees from the AP position. This specific rotation is critical as it aligns the ankle mortise parallel to the X-ray beam, ensuring that the distal tibia and fibula are properly visualized with minimal overlap. The beam is centered at the ankle joint, capturing the relationship between the tibia, fibula, and talus.


    The utility of the Mortise view lies in its ability to provide a detailed evaluation of the ankle joint, including the distal tibiofibular syndesmosis, the medial and lateral malleoli, and the clear space between the tibia and fibula. This view is particularly valuable for identifying subtle misalignments or fractures that may not be visible on standard AP views, offering a comprehensive assessment of ankle stability and integrity. There are a few important measurements to take note of on the mortise view:


    Talar Tilt: More than 2 mm of difference between the superior medial and lateral joint spaces of the ankle in the AP view indicates a disruption of the lateral or medial stabilizing structures of the ankle. Talar tilt assesses the integrity of the ankle mortise and its surrounding ligaments by measuring the angulation of the talus within the ankle joint. An increased tilt may indicate damage to the ligaments, such as the deltoid ligament medially or the lateral collateral ligaments, leading to instability of the ankle joint.


    Medial Clear Space: In the mortise view of the ankle, this is defined as the distance between the lateral border of the medial malleolus and the medial border of the talus. Normally, this space should not exceed 4-5 mm. A value greater than 4-5 mm is considered abnormal and suggests a lateral shift of the talus, which can indicate  ligamentous injury or instability within the ankle joint.


    Talocrural Angle: This angle is formed by the intersection of two lines: one drawn between the tips of the medial and lateral malleoli (the intermalleolar line) and the other parallel to the tibial joint surface. A normal Talocrural angle typically measures approximately 83 degrees. This angle provides insight into the geometric relationship between the distal tibia and the talus, reflecting the congruency of the ankle mortise. A deviation from the normal range can indicate a variety of pathological conditions affecting the ankle's structural alignment. For instance, an increased Talocrural angle may suggest a talar tilt or a disruption of the syndesmosis, indicating potential ligamentous injury or fracture that has led to an alteration in the normal articulation between the tibia and talus. Conversely, a decreased angle might reveal joint space narrowing or other degenerative changes.

  • Stress Views

    Stress views of the ankle are particularly useful for detecting dynamic instabilities in cases with suspected injury but no evident syndesmotic widening on standard X-rays. However, stress views involve specific positioning and techniques. For mechanical stress views, the patient may be positioned supine or upright, with the leg extended and internally rotated by 15° to 20°; a second person then applies supination and external rotation to the ankle. Alternatively, gravity-assisted stress views require the patient to be in a lateral decubitus position or sitting with the ankle overhanging a support, again with the leg internally rotated by 15° to 20° to simulate mechanical stress using gravity. These procedures can be uncomfortable, necessitating clear explanation to the patient beforehand. Moreover, precise positioning and communication among the radiographer, patient, and physician are essential for capturing the radiograph at the optimal moment, ensuring the procedure's success in identifying potential ankle joint instabilities.

Additional Resources on IPV

Given the significant intersection between intimate partner violence (IPV) and orthopaedic injuries, healthcare professionals, especially those within orthopaedics, are encouraged to explore dedicated resources on IPV. The following resources offer valuable insights into identifying and managing those experiencing IPV, fostering a deeper understanding of the crucial role orthopaedic practitioners play in addressing this pervasive issue.

Ending Violence

Association of BC

Visit Website

PRAISE Study

A multinational prevalence study

Read Paper

IPV in Ontario

The prevalence of intimate partner violence across orthopaedic fracture clinics in Ontario

Read Paper

Ending Violence

Association of BC

Visit Website

PRAISE Study

A multinational prevalence study

Read Paper
Share by: